Written by
Amy
on
on
Container Controller
Container ViewController
- 목표: Container ViewController인 UINavigationController, UITabBarController, UISplitViewController를 통해 View Controller의 구조를 알아본다.
UI Navigation Controller
- View Controller의 Container 역할을 하는 View Controller
- Apple 공식 문서 읽기
UI Navigation Controller의 구조 : Navigation stack
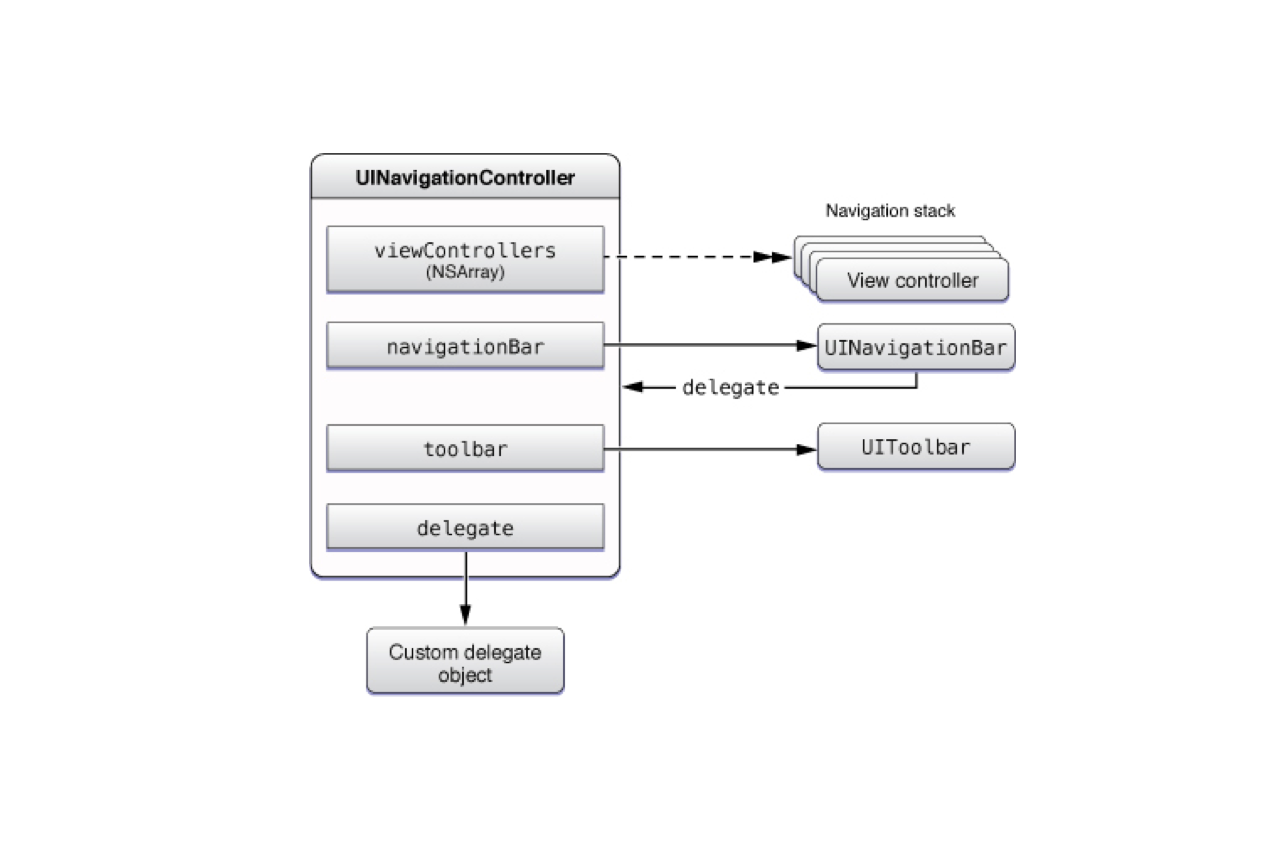
- View Controller들을 array로 가지고 있으면서 스택 구조로 관리하는 컨테이너이다.
- viewControllers(Array)와 navigationBar, toolbar로 이루어져 있다.
- UIToolbar는 기본 hidden상태로 존재 한다.
- Navigation stack is represented by an array of view controllers.
- The first view controller in the array is the root view controller.
- The last view controller in the array is the view controller currently being displayed.
- segue, method(push,pop), back button, left-edge swipe gesture을 통해 view controller 들을 추가하고 삭제할 수 있다.
설정 방법
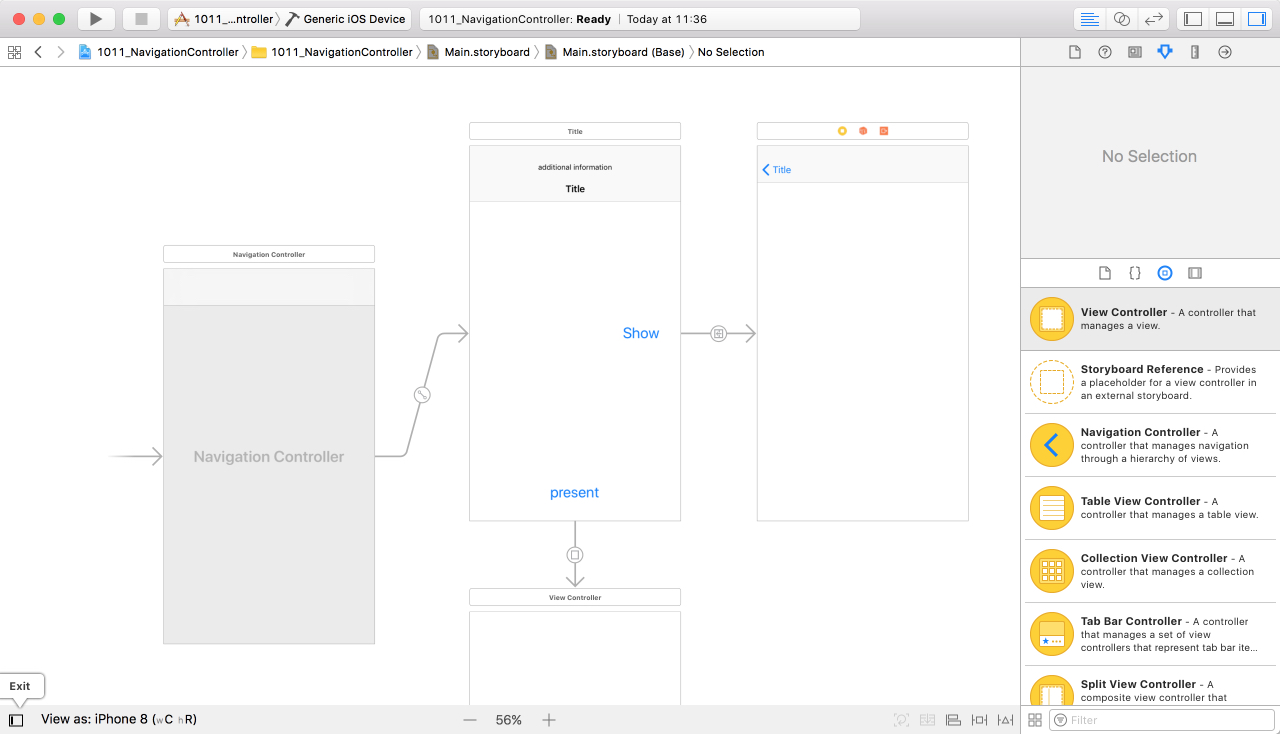
- 뷰콘트롤러에서 Editor -> Embed in -> Navigation Controller
- 우측 하단 오브젝트 라이브러리에서 UINaviagationController를 Drag and Drop!
View Controller의 구조
- Container View Controller의 구조를 알아보기위해 프로젝트에서 스토리보드와의 연결을 끊고, 코드로 작성해본다.
- 우선 App Delegate의 didFinishLaunchingWithOptions 메소드 부분에서, UIwindow의 인스턴스인 window를 만든다.
- window의 rootViewController로 UITabBarController를 올리고, 그 위에 하나의 탭에는 UINavigationController를 올리고, 다른 탭에는 UIViewController를 올린다.
- UINavigationController의 rootViewController를 지정해준다.
- 자세한 내용은 아래 코드를 참조.
class AppDelegate: UIResponder, UIApplicationDelegate {

var window: UIWindow?

func application(_ application: UIApplication, didFinishLaunchingWithOptions launchOptions: [UIApplicationLaunchOptionsKey: Any]?) -> Bool {
        // Override point for customization after application launch.
        // 스토리보드와의 연결을 끊어놨기 때문에, 현재 UIApplication과 AppDelegate만 있는 상태로, UIWindow부터 새로 만들어야 한다.
        window = UIWindow(frame: UIScreen.main.bounds)

        // 01. instantiateInitialViewController() : initial로 설정된 뷰콘트롤러가 있을 경우 바로 인스턴스
        // let rootVC: ViewController = storyboard.instantiateInitialViewController() as! ViewController

        // 02. UIViewController()의 인스턴스를 바로 만들어서 rootViewController로 설정할 수도 있다.
        let rootVC = UIViewController()
        rootVC.view.backgroundColor = .blue

        // 03. main 스토리보드를 통해 ViewController의 인스턴스를 만들고, UINavigationController에 rootViewController로 추가한다.
        let storyboard = UIStoryboard(name: "Main", bundle: nil)
        let navRootVC: UIViewController = storyboard.instantiateViewController(withIdentifier: "ViewController") as! ViewController
        let naviController = UINavigationController(rootViewController: navRootVC)

        // 04. window의 rootViewController로 tabBarController를 설정한다.
        let tabBarController = UITabBarController()
        // 05. tabBarController에 viewController들을 array로 담는다.
        tabBarController.viewControllers = [rootVC, naviController]

        window?.rootViewController = tabBarController
        window?.makeKeyAndVisible()

        return true
    }
}
UINavigationController를 통한 Push, Pop
@IBAction func pushHandler(_ sender: Any) {

	// 스토리보드를 통해 ViewController를 instantiate 해준다.
	// 여기서는 itemDetailViewController 클래스의 인스턴스인 nextVC 뷰콘트롤러

    let nextVC: itemDetailViewController = self.storyboard?.instantiateViewController(withIdentifier: "itemDetailViewController") as! itemDetailViewController

    // 자신의 navigationController에게 nextVC 푸시를 요청한다 : pushViewController
    self.navigationController?.pushViewController(nextVC, animated: true)
}

func popAction() {
	// 자신의 navigationController에게 pop을 요청한다.
    self.navigationController?.popViewController(animated: true)
}
Navigation Bar
- 네비게이션 인터페이스를 관리 하는 뷰
- 외관은 custom할 수 있으나, frame, bounds, alpha values는 바꿀 수 없다
- NavigationItem array를 가지고 있다.
- Bar의 높이 = 20(StatusBar height) + 44(Base NavigationBar Height)
- self.navigationController?.navigationBar.prefersLargeTitles = true
- 위 Method 활용 시 iOS11에서 Large Title을 적용할 수 있다.
UI Navigation Item
- UINavigation의 각 ViewController를 관리하기 위해 만들어지는 인스턴스.
- Navigation Bar에 array로써 들어가있다.
UI Bar Button Item
- 원하는 View를 만들고 (ex. 라벨, 버튼)
UIBartButtonItem(customView: UIView)에 넣어서UINavigationItem의 left 또는 center 또는 right에 넣는다.
let nextBtn = UIButton()
nextBtn.setTitle("🙃👉🏻", for: .normal)
nextBtn.addTarget(self, action: #selector(nextBtnHandler), for: .touchUpInside)
self.navigationItem.rightBarButtonItem = UIBarButtonItem(customView: nextBtn)